What is the Bulletmeister Script For?
Bulletmeister is a script for Adobe InDesign designed to simplify and automate the creation of custom lists (checklists or bullet lists) with flexible settings.

- Quickly create lists with custom bullets or checklists.
- Adjust the size, spacing, and positioning of bullets.
- Automatically process multiline text frames, splitting them into individual elements and turning them into a list.
- Disassemble lists created by the script back to their original state for editing.
Why is it Better Than InDesign’s Built-in Features?
InDesign’s standard tools for managing bullets have limitations:
- They rely on font glyphs, which can be cumbersome and inconvenient when changing designs.
- They don’t allow easy scaling or color changes for bullets independently of the text.
- They offer limited options for working with graphic elements.
Bulletmeister addresses these issues by providing an automated tool with an intuitive interface.
- Automation: The script automatically processes multiline text, aligns elements, and manages object names—something standard InDesign features can’t do.
- Flexibility: You can precisely adjust the size, spacing, and direction of the list, which isn’t available in standard paragraph styles with bullets.
- Time-saving: Instead of manually creating and positioning bullets (especially for multiple lines or frames), the script does it in seconds.
- Precision: Settings in millimeters ensure accurate positioning, which is hard to achieve manually.
- Manageability: Object names make it easy to manage lists later, especially in complex documents.
Installing and Running the Script
Via the Scripts Panel
- Install the script: Copy the
bulletmeister.jsxbinfile to the user scripts folder.
Folder for user scripts:
- Windows:
C:\Users\Username\AppData\Roaming\Adobe\InDesign\Version XX\en_US\Scripts\Scripts Panel\ - Mac:
/Users/Username/Library/Preferences/Adobe InDesign/Version XX/en_US/Scripts/Scripts Panel/
- In InDesign, open the Scripts panel:
Window → Utilities → Scripts. - Select the script:
- Open the
Userfolder. - Double-click the script name to launch it.
Drag-and-Drop into InDesign
Convenient for one-time use without adding it to the panel.
- Drag the
bulletmeister.jsxbinfile from File Explorer (Windows) or Finder (Mac) directly into the InDesign workspace. The script will run immediately.
Script Interface

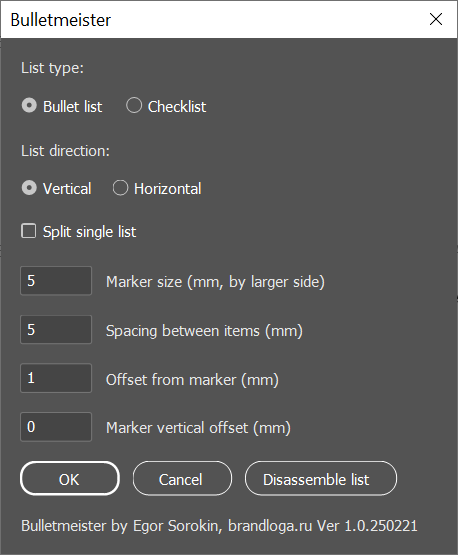
When launched, a “Bulletmeister” dialog window appears with the following elements:
- List Type:
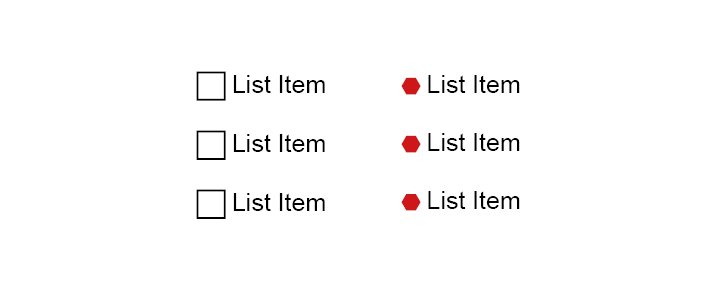
- Bullet List (default) — Creates a list with a custom bullet marker (“bullet”).
- Checklist — Creates a list with square checkboxes as markers. No separate bullet element is required for checklists.
- List Direction:
- Vertical (default) — List items are stacked vertically.
- Horizontal — List items are placed side by side.
- Split single list:
- Splits text into separate text frames for each line. Useful when working with a single multiline text frame or a bullet plus a multiline text frame.
- Automatically enabled if a single multiline text frame (or bullet + multiline frame) is selected.
- Marker size:
- Sets the size of the marker (square or bullet) in millimeters. Defaults to 5 mm but adjusts to the largest dimension of the selected bullet if one is provided.
- Spacing between items:
- Sets the distance between list items in millimeters (default is 5 mm).
- Offset from marker:
- Sets the horizontal offset between the marker and text in millimeters (default is 1 mm).
- Marker vertical offset:
- Sets the vertical offset of the marker relative to the text baseline in millimeters (default is 0 mm). Useful for manual correction if the script misaligns the bullet or checkbox.
- Disassemble list — Breaks down existing lists (groups named
chklst_itemorlst_item), removing markers and returning text frames to their original positions.
Workflow
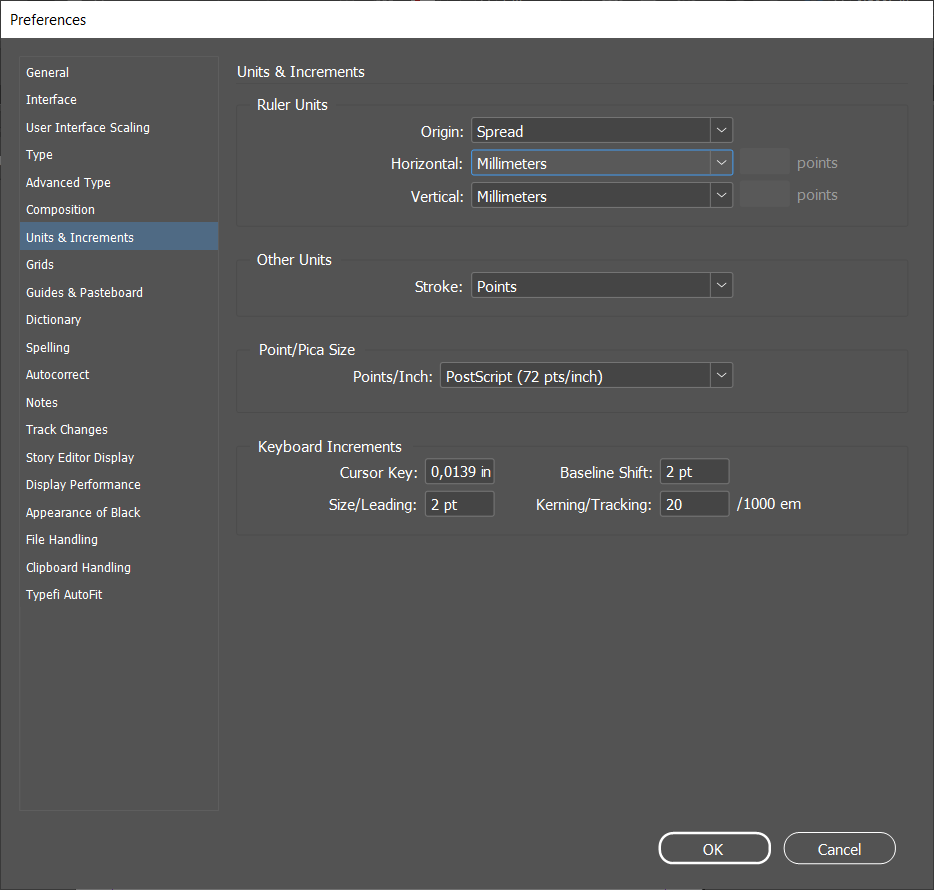
Important! Ensure your document’s units are set to millimeters for correct sizing and spacing.
- Globally change this in
Edit → Preferences → Units & Increments(Windows) orInDesign → Preferences → Units & Increments(Mac). SetHorizontalandVerticalto millimeters in the Ruler Units section.
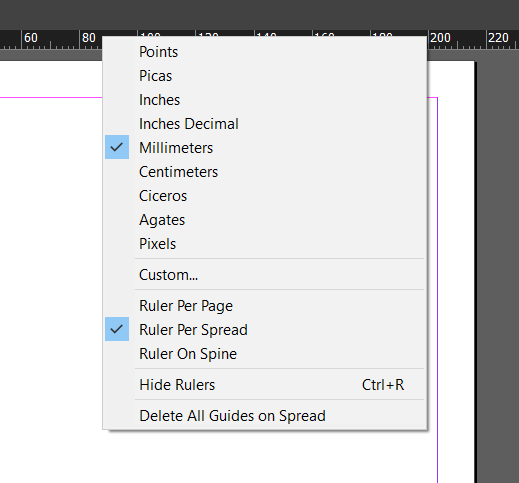
- Alternatively, right-click the rulers and select millimeters.

Creating a Bullet List
- Create a graphic object (e.g., a circle or star) and name it “bullet” in the Layers panel.
- Select this object along with one or more text frames (single-line or multiline).
- Run the script. If a bullet and a multiline text frame are selected, the “Split single list” option will be auto-enabled, splitting the multiline frame into individual lines and list items.
- Adjust list settings: marker size, spacing, offsets, and direction. The marker size defaults to the largest dimension of the selected bullet but can be manually adjusted.
- Click “OK”. The script creates groups with the following names:
- Group:
lst_item. - Bullet:
bullet. - Text frame:
lst_text.
Each text frame is paired with a copy of the bullet, aligned according to the specified settings.
Creating a Checklist
A checklist is essentially the same as a bullet list but uses a predefined square checkbox as the marker.
- Select one or more text frames (no bullet required).
- Run the script. If a single multiline frame is selected, “Split single list” will be auto-enabled.
- In the dialog, select “Checklist” and adjust settings: marker size, spacing, offsets, and direction.
- Click “OK”. The script creates groups with the following names:
- Group:
chklst_item. - Square (marker):
chklst_checkbox. - Text frame:
chklst_text.
Each text frame is paired with a square, aligned according to the specified settings.
Disassembling a List
If you need to edit or redo a list created by the script:
- Select one or more groups named
chklst_itemorlst_item(created by the script). - Run the script and click “Disassemble list”.
- Markers (squares or bullets) are removed, and text frames return to their original positions, accounting for their initial offsets.
Where to get
Questions
Email: sorokin.ea@gmail.com
Telegram: @smiling_lion


Leave a Reply